· Attribute view acts like a dimension.It joins multiple tables and acts as Master.
· Attribute views are built specifically for master data.
· There is no measure and aggregation option.
· Attribute view is reusable objects.
· Their primary purpose was to maintain a reusable pool of master data which could then be combined with transaction data in Calculation views or Analytical views
· It doesn’t store the data physically, however, fetches the data from a source in runtime whenever we execute this object in our system.
Creation of Attribute view:
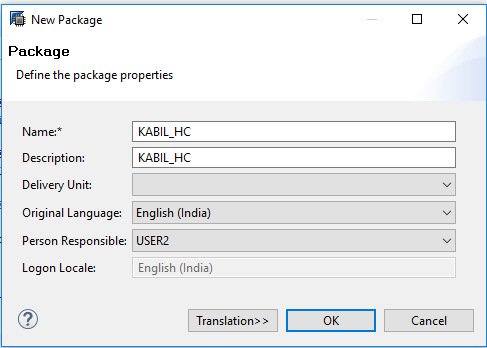
Step 1: Create Package by right click the Content and select New and select Package
Step 2: Then we get a package creation Pop-up screen where we are required to enter its Technical name, Description, Delivery unit, Language, and Person responsible.
Click ‘OK’ after entering the details. We should then be able to see a package with the same name under our content folder. Here, I named it as “KABIL_HC”.
Step 3: Create Attribute View by right click the package “KABIL_HC” and select New and select Attribute View.
In the below screen we have to enter the details for our Attribute View, like Technical Name, Description(Label) and Type of object (Subtype). We can create three types of Attribute Views, they are
1. Standard
2. Time
3. Derived
Standard: This is normal attribute view which is defined on one or multiple source tables that has already sourced in HANA.
Time: If we need to create time dimension based on time/date tables that we have in our HANA system under _SYS_BI schema, then we can choose this.
The tables are M_TIME_DIMENSION and M_FISCAL_CALENDAR.
Derived: If we want to derive a view from an existing attribute view then we need to choose this. The only editable in this type is the description of the new Attribute View.
If we want to define an attribute view by using one of our existing objects as a copy, then we can choose ‘Copy From’ option.
Note: The difference between Copy from and Derived is that in case of derived we can only edit the description of the new attribute view, all the remaining changes can only be performed on the base object. In case of Copy From we can modify our copied view entirely.

The below screen opens up. Notice that the semantics is not connected to an Aggregation node here. It is connected to a “Data Foundation”.

A “Data Foundation” is a node which you cannot remove. It is purely used to include tables into the view. You can use a singular table here or have more by specifying the join condition inside this “Data Foundation”.
You cannot insert views into the “Data Foundation”. It only accepts tables.
Step 4: Now Drag and Drop the required tables and select required fields.
Step 5: Now we are going to create a Calculated Column by right click the Calculated column and select New. A Pop-up screen will appear

Here I wrote an expression for Full name “FIRST_NAME”+’ ‘+”LAST_NAME”.
Step 6: Now Drag and Drop the “TH_EMP_MASTER” tables and select required fields.
Step 7: And the make a join link between the table with the relationship. In default, the join will be the referential join. In a property, opening up the JOIN type setting provides a list of available options. Switch it to LEFT OUTER JOIN (you can choose any type which is required for you).
Step 8: Finally, Save and activate this view. Now execute a data preview to check the data. As seen below, the JOIN is successful and data appears as required.
Result:

Thank you for visiting...
Share your comments...