A temporal join lets you set time intervals for which you want to fetch records. It indicates the time interval mapping between the master data and the transaction data.
The temporal join is based on the date field from the fact table and the time interval (to and from fields) from the master data view. The date field from the fact table is called temporal column.
This means that the tables are joined if the temporal column values in the fact table are within the valid time interval values from the master data view. A time interval is assigned to each record in the results set, and the records are valid for the duration of the interval to which they are assigned.
The supported data types for Temporal Column, From Column, and To Column are timestamp, date, and integers only.
Follow the below steps to define the temporal join:
v Join type should either be Referential or Inner.
v Temporal Column is the one used to check the validity condition and usually from left table (Transaction data).
v From column and To column hold the validity range values and usually from right table
(master data)
(master data)
Temporal Condition
|
Meaning
|
Include to Exclude From
|
This temporal condition includes the value of the To Column field and excludes the value of the From Column field while executing the join.
|
Exclude to Include From
|
This temporal condition excludes the value of the To Column field and includes the value of the From Column field while executing the join.
|
Exclude Both
|
This temporal condition excludes the value from both the To Column field and the From Column field while executing the join.
|
Include Both
|
This temporal condition includes the value from both the To Column field and From Column field while executing the join.
|
Example:
Create a Table:
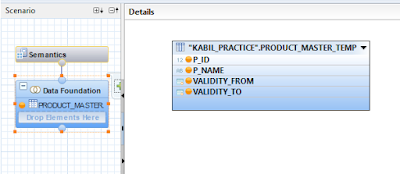
Code:create column table "KABIL_PRACTICE"."PRODUCT_MASTER_TEMP"("P_ID" integer,"P_NAME" Nvarchar(30),"VALIDITY_FROM" DATE,"VALIDITY_TO" DATE);Insert a Records;INSERT into "KABIL_PRACTICE"."PRODUCT_MASTER_TEMP" VALUES (1,'Nokia E6','20150101','20150201');INSERT into "KABIL_PRACTICE"."PRODUCT_MASTER_TEMP" VALUES (2,'MOTO G4','20150301','20150401');INSERT into "KABIL_PRACTICE"."PRODUCT_MASTER_TEMP" VALUES (3,'HTC 828','20150501','20150601');
Results:
 |
| PRODUCT_MASTER_TEMP |
Create a Product SALES Table:
Code:create column table "KABIL_PRACTICE"."PRODUCT_SALES_TEMP"("P_ID" integer,"SALES_DATE" DATE,"UNIT_SOLD" integer,"REVENUE" integer);
Insert a Records into the table:
INSERT into "KABIL_PRACTICE"."PRODUCT_SALES_TEMP" VALUES (1,'20150101',112,1512000);
INSERT into "KABIL_PRACTICE"."PRODUCT_SALES_TEMP" VALUES (1,'20150205',26,351000);
INSERT into "KABIL_PRACTICE"."PRODUCT_SALES_TEMP" VALUES (1,'20150116',12,162000);
INSERT into "KABIL_PRACTICE"."PRODUCT_SALES_TEMP" VALUES (2,'20150221',106,1325000);
INSERT into "KABIL_PRACTICE"."PRODUCT_SALES_TEMP" VALUES (2,'20150301',23,218500);
INSERT into "KABIL_PRACTICE"."PRODUCT_SALES_TEMP" VALUES (2,'20150331',35,332500);
INSERT into "KABIL_PRACTICE"."PRODUCT_SALES_TEMP" VALUES (2,'20150406',46,437000);INSERT into "KABIL_PRACTICE"."PRODUCT_SALES_TEMP" VALUES (3,'20150411',89,890000);INSERT into "KABIL_PRACTICE"."PRODUCT_SALES_TEMP" VALUES (3,'20150501',87,870000);INSERT into "KABIL_PRACTICE"."PRODUCT_SALES_TEMP" VALUES (3,'20150608',91,910000);INSERT into "KABIL_PRACTICE"."PRODUCT_SALES_TEMP" VALUES (3,'20150623',102,1020000);INSERT into "KABIL_PRACTICE"."PRODUCT_SALES_TEMP" VALUES (3,'20150116',64,640000);
Results:
 |
| PRODUCT_SALES_TEMP |
Now create a calculation Dimension View For Product Master Table:
STEPS:
- Right Click Package and Select Attribute View and Give a name for that view. Here My view name is AT_PRODUCT_MASTER_TEMP.
- Now Drag and drop a Product_Master_Temp table into a Data Foundation.
AT_PRODUCT_MASTER_TEMP - And Select a required field.
- Then validate and Activate the View.
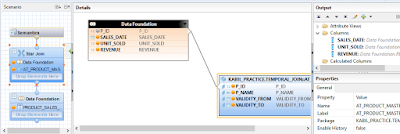
- Also we will create the Analytic view. Here my View name is AN_PRODUCT_MASTER_AND_SALES with Product_sales table in data foundation layer and let's try to join above-created Attribute view in Logical join node.
AN_PRODUCT_MASTER_AND_SALES - And Select Require field and make a join between them using P_ID (Product_ID).
Join Property - Then click validate and activate this view.
- Results : Data preview -Raw data.
 |
| Include Both |
Temporal Condition: Exclude Both
 |
| Exclude Both |
Temporal Condition: Exclude To Include From
 |
| Exclude To Include From |
Temporal Condition: Include To Exclude From
 |
| Include To Exclude From |
NOTE:
we can't create temporal Join in the Calculation view in SPS09.
Download this article: Temporal Joins
Thank you for visiting my blog….
Share your comments….


Thanks for sharing informative post.
ReplyDeleteSAP UI5 Online Training in India
we are all happy to your knowledge this may more help to us will you have youtube channel.....?
ReplyDeleteif you have please share to my mail id
ambatisateeshreddy2013@gmail.com
ReplyDeleteCan you please explan the join conditions. I don't get why there are less in include both than in exclude both... can you maybe explain what include and exclude mean in this case?
ReplyDelete